Connected insole
[tl;dr] As a personnal project, I worked on an insole with pressure sensors that communicates via Bluetooth to a web app (test it at this address)
Background
The Connected Insole project began under the name “YAWO” during the 2019 SDG Summer School at CRI.
The goal of the team was to produce a “connected insole (a wearable insole) for diabetic patients suffering from Type 2 diabetes. The insole would consist of several pressure sensors to give dynamic feedback of the patients’ plantar pressure. This data would be continuously processed and the user or doctor would be provided with an alert when a disorder was detected. Based on the received input the user could correct their walking stance”.
More information on the project can be found on those links :
Final prototype of the summer school – picture from the YAWO team
They achieved to build an insole with DIY pressure sensors able to transmit data through the serial port of an arduino board to a processing script.
This work was a great proof of concept but several points needs to be improved for the device to be a usable product, such as wireless communication.
Goal
My goal for this project is to work on wireless communication between the insole and an app installed either on a phone or on a computer.
However, I worked with slightly different materials than the YAWO team as I was provided with a commercial insole-shaped pressure sensor matrix.
Hardware
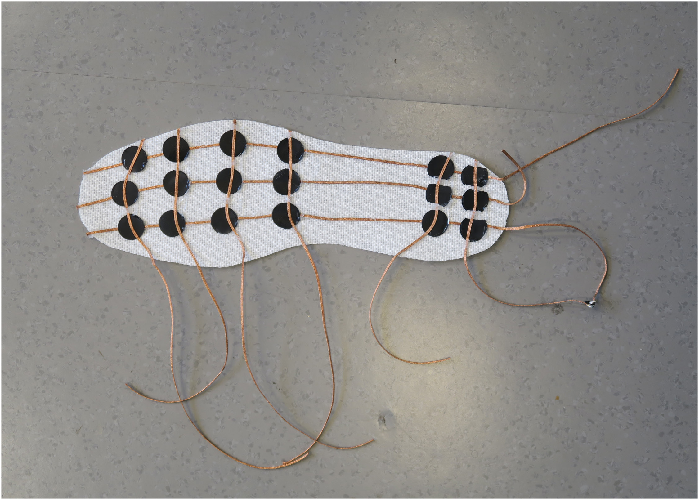
The Insole
The insole used, the RX-ES42-16P, is a \(4 \times 6\) pressure sensors matrix between two plastic sheets. It consists of 16 pressure sensors organized as follows.
A matrix is an efficient way of packing a lot of sensors while using less pins : we define column and row pins connected to multiple sensors such that each pair row pin/column pin is only connected to one sensor. Then if we take measures between one row and one column at a time, we can measure all n sensors while only using \(\sqrt{n}\) digital output pins and \(\sqrt{n}\) analog input pins.

Schematics of the RX-ES42-16P insole
The Micro-controller
As a micro-controller, I used a Feather nrf 52.
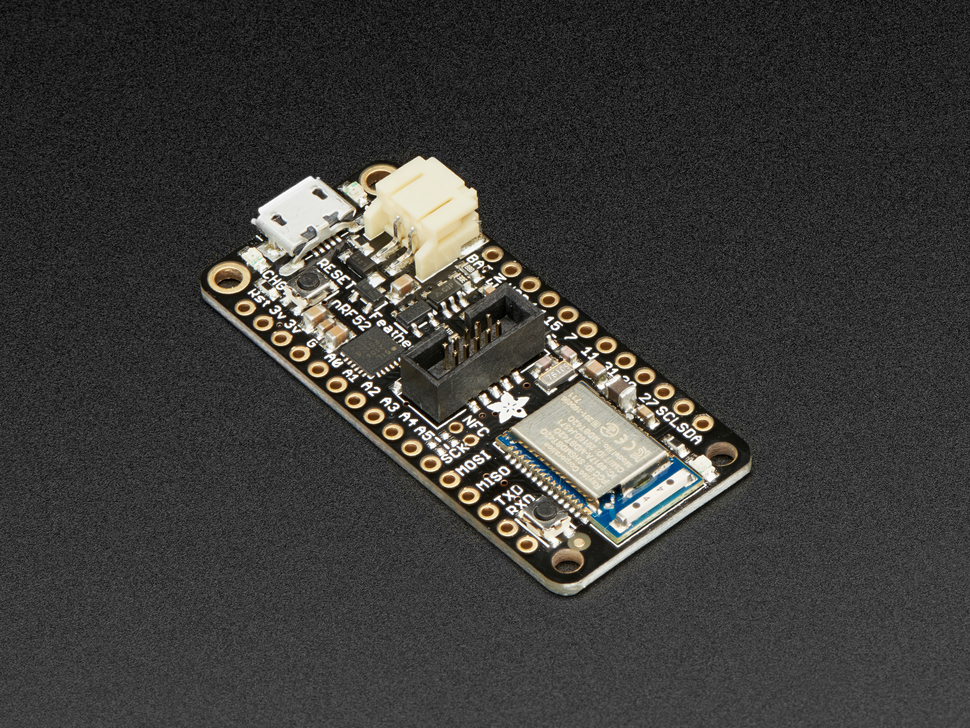
Picture of a nrf 52 Feather board - picture from adafruit's website
This Arduino-compatible board is able to communicate through the Bluetooth Low Energy (BLE) protocol.
The circuit
Usually when dealing with electrical matrix, multiplexers are used to reduce the number of pins used.
A multiplexer is an electrical component that essentially behave like a switch that can connect one input pin to a single output pin and that is controlled electronically. The advantage is that if you have \(n\) output pins, you only need \(log_2(n)\) bits to encode the information about which pin you want to connect. For example, if I need to measure 8 sensors, I could use 8 analog input pins but I could also connect all the sensors to a single analog input pin through a multiplexer and control the multiplexer with only 3 digital output pins.

Schematics of a multiplexer
The feather micro-controller has 6 analog input pins, and I didn’t need to connect the board to other things, so after experimenting with multiplexers I chose to not use them for simplicity.
The circuit is thus really simple.
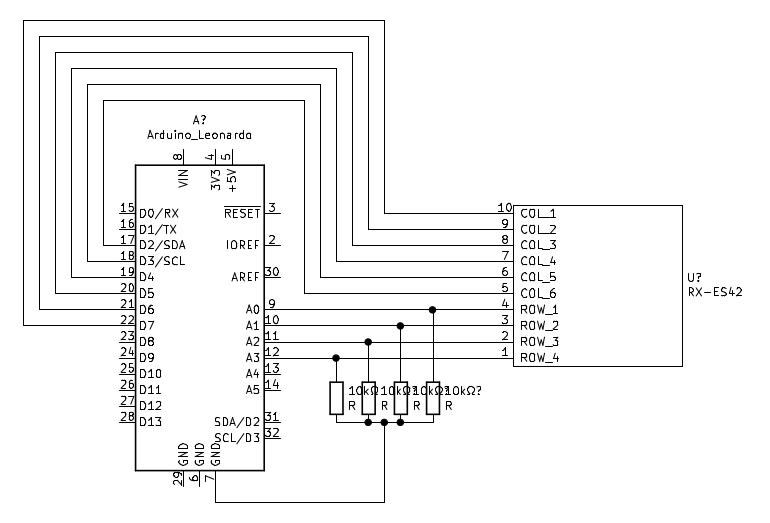
Schematics of the circuit used
Arduino code
Reading the sensors
I created a table that links each of the 16 sensors to its column-row pair. To read all the sensors, the feather nrf 52 board only has to iterate over this table, to send power to the column pin and not to the other columns, then to read the correct row pin.
const int sensors[16][2] = { {d3,c},{d3,b},{d4,c},{d4,b},{d2,d},...

void read_all_sensors(){
    for (int i_sens=0;i_sens<nb_sensor;i_sens++){
        // setting the sensor pin HIGH
        digitalWrite(sensors[i_sens][0], HIGH);
        // and all other columns to LOW
        for (int j_col=0;j_col<nb_col;j_col++){
          if (colPin[j_col] != sensors[i_sens][0]){
            digitalWrite(colPin[j_col], LOW);
            }
          }
        // reading the sensor value
        sensorValues[i_sens] = analogRead(sensors[i_sens][1]);
}
Bluetooth support
I stole the code for Bluetooth from a tutorial made by Sayanee Basu for the website hutscape and distributed under the MIT licence.
I didn’t even change the advertising name of the device :/
Even though the example code only sends integers, it turned out that it can send arrays of integers without any modifications.
Web App
Test the app by yourself (I added an option to generate random numbers so that you can test the data viz I created even if you don’t have access to the insole)
A quick story about me wasting time
Once we have a device sending data via Bluetooth, we need an app to receive it.
Since the beginning there was two possibilities : either making a phone app or a web-based app. Indeed, while Bluetooth was until now a technology mostly used with mobile devices, it is now possible to connect Bluetooth device directly from a browser thanks to the Web Bluetooth API (it is however not available in Firefox).
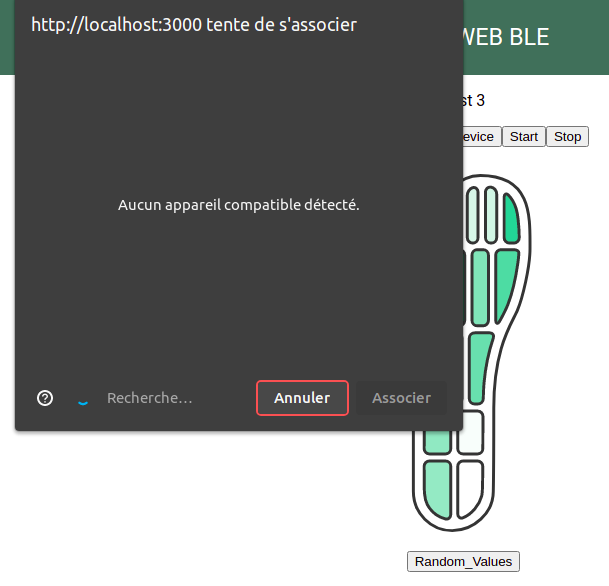
Web Bluetooth API on chrome browser
My choice was initially to build a native phone app. The final goal of this project would be for the insole to store the data locally, for example on a small flash memory card, and then to upload all the data at once to a computer, however, I feared that I wouldn’t achieve this goal in 3 month ( and indeed I didn’t). I felt that creating a system that would just stream the data to the computer in real time would be more manageable. Yet, if you want to record what the insole is sensing for a 15 min walk, you’ll have to stay around the device that is recording (and BLE has a scope of around 10m), which is easier if this device is a mobile phone and not a big computer.
However, after 2 months, plenty hours of react native courses watched, way to many incomprehensible bugs and still no results, Kevin from the makerLab shared with me the example code from Sayanee Basu that used the Web Bluetooth API, which worked so easily when I tried to test it on my side that I decided to just throw away 2 month of work, essentially switching to a web-based approach.
Solving exploration–exploitation dilemma has never been my strength : I should have considered longer the two possibilities before investing that much time into learning native phone app development.
Ble Manager
To manage Bluetooth communication, I used once again the code from the tutorial made by Sayanee Basu for the website hutscape.
I refactored it to be more object-oriented, by packing it into an class. The goal was to make a piece of code easily reusable,which, I think, was a success. Indeed after my refactor, you only need to import my small module, create a new bleManager instance, give it some parameters, like the name of the device or the events to trigger each time a new value is sent through Bluetooth. Then the user only access the Bluetooth manager through 3 functions : one for connecting a device, one for starting data streaming and one for stopping data streaming (this was already in the example code I stole from).
Interface
I created the web App with React as framework (mostly because I wanted to use what I had learned during my two months of struggles learning react native).
To display the data from the insole I created a basic svg component with the ability to control the opacity of the sensor fill color. Even if it’s quite pretty I have concerns about the readability of this interface… Guess I’m not a real UX designer.

Screenshot of the final web app
Improvements
Loads of improvements are possible for this project :
-
Using multiplexers to optimize the number of pin used and eventually use a smaller micro-controller.
-
Work on power management for the insole : until now the system is powered by an usb cable !
-
Allow the web app to record the data and send it to a database or save it in a csv file.
-
Create an other mode where the insole stores the data in a flash drive then upload everything in bulk.
-
Create a better visualization of the sensor data : maybe just changing the color ramp could make the data easier to read
-
If you want to work on this project, don’t hesitate to contact me and to visit the makerLab at CRI to test the prototype we made.
Links
All my code is available on GitHub
Here are some slides I made to present my project (I had only 5 minutes to present and my evaluators were more interested about the skills I learned than the actual details of the insole)
You can still test the web app